Constructive procrastination - Write a tutorial
My my, it’s been for EVER since I’ve written a post, I sincerely apologise. I was thinking about reviewing Miss Pettigrew Lives for a Day, but something else far more exciting has come to mind. Recently, my brother’s Moleskine notebook fell apart, (sad face) and he asked me how to repair it. I took some pictures to show him, so I may as well show everyone, too!
How to repair a book that has fallen out of it’s cover
You will need:
· PVA glue
· Something to spread the glue with, like a paintbrush
· Scissors
· A pencil
· Strong paper, of a similar colour of the paper of the book’s pages (In my tutorial I’ve used blue to make it easier)
· 2 sheets of shiny magazine paper
· A spoon
· Some heavy books
Oh noes! My book has fallen out of its cover. This is a very sad occasion indeed. But it’s okay, we can fix it!
First, we need to re-strengthen the spine. Just out a thin layer of PVA glue along the spine. If necessary, measure out the dimensions of the spine and cut out a strip of paper to glue to the spine. This process actually happens within bookbinding itself, and with older volumes, you’ll often see other paper glued on the spine, much like this.
Next, get your piece of strong paper. I’ve used blue so you can tell what I’m doing. If your first page has a lot of writing on it, you may want to take a picture - you can re-write whatever was on it, because unfortunately some of the page will be covered. Draw around your book and cut out the rectangle.
 Cut this in half lengthways, and fold each half in half, and use a spoon to make the fold nice and crisp.
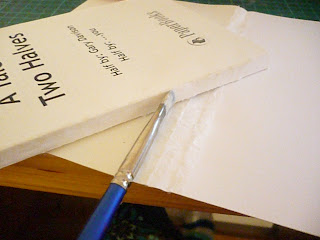
Glue one side of the folded strips with a thin layer of glue.
This section can be quite fiddly. Carefully align the strip, with fold aligning the spine, on the book block (the book without it’s cover) With your spoon, really sharpen up the fold, and press down on the area which you have glued, making sure you get rid of any air bubbles.
Repeat on the other side. Hey, it looks like your book has wings!
Next, fold the cover around the book block as if you are covering it again. Carefully lay it down on a flat worktop, making sure to keep the cover and book block aligned. Carefully unfold the cover back. Insert your shiny sheet of magazine paper in-between the ‘wing’. You need to use shiny magazine paper because it won’t stick so badly and will be easier to handle. Use a thin layer of glue on the ‘wing’. Keep the magazine paper within the folds.
Close the book, pressing down with your spoon on the cover, again making sure you press out all the air bubbles.
As you can see, I’ve written on the blur paper where the words on the page were covered up.
Leave the book to dry for a while under a heavy weight of books.
Ta-da! Just a simple book repair for any books that fall apart.
Spring is finally here and spring means daffodils. I've been to the lake at uni twice now to pick some. they are so pretty!


